Manage a connection between PHP and an Arduino board
published: 3 June 2019 / updated 4 June 2019

Prerequisites
To communicate a Web application with an ARDUINO card, you must first:
- mount a web server on the PC connected to the ARDUINO board. For us, it's the Apache server which was mounted. You have a complete turnkey solution WAMP (Windows Apache MySQL PHP) available right here: www.wampserver.com/.
- mount a version of the FORTH language on the ARDUINO board. This is not necessary if your code compiled in C can handle commands from the serial port ensuring the link between the server PC and the ARDUINO card.
To make communication tests between your web server and the ARDUINO card, create a subdirectory arduino
in your development space on the server PC and assign an arduino alias to the Apache server
link with this directory arduino. You can open the web page by typing as URL: http://localhost/arduino/.
ATTENTION
To work, the ARDUINO board must always be connected to the PC on which the Apache server is installed.
The Apache server runs in the background and does not prevent the PC for other uses.
Pausing or stopping the PC on which the Apache server is installed interrupts communication between the scripts in PHP language and the ARDUINO card.
The PHP script will not work if it is installed on a remote server.
The HTML code and PHP rough formwork
We connected our ARDUINO board containing the FORTH language on the COM7 serial port USB cable.
From this moment, we will replace the communication terminal <-> card with a communication web server <-> card. To do this, it is imperative to close the terminal that communicates with the card if this terminal is open.
In the arduino directory corresponding to the arduino alias, we create the index.php file that contains the following content:
<!DOCTYPE html>
<html>
<head>
<title>gestion carte ARDUINO sur COM7</title>
<meta charset="UTF-8">
<meta http-equiv="Content-Type" content="text/html; charset=utf-8" >
</head>
<body>
<article>
<h1>Gérer une liaison entre PHP et une carte Arduino</h1>
<?php
$device = "COM7";
exec("mode $device BAUD=38400 PARITY=n DATA=8 STOP=1 xon=off octs=off rts=on");
$comport = @fopen($device, "wb+");
var_dump($comport);
if ($comport) {
    sleep(1);
    fputs($comport,"\n");
    sleep(1);
    $result = fgets($comport);
    var_dump($result);
    fputs($comport,"words\n");
    sleep(1);
    $result = fgets($comport);
    var_dump($result);
    sleep(1);
    $result = fgets($comport);
    var_dump($result);
    fclose($comport);
}
?>
</body>
</html>
ATTENTION
The PHP code given as an example is raw formwork. It is Windows compatible and must be adapted if you are running Linux.
There are no error tests or code optimizations.
If your Apache server is active, open the browser of your choice (Firefox, Chrome, etc ...),
and in the URL bar, type:
http://localhost/arduino/
PHP code execution result in index.php:
Gérer une liaison entre PHP et une carte Arduino

C:\HTMLEDIT\arduino\index.php:15:resource(4, stream)

C:\HTMLEDIT\arduino\index.php:21:string '?E FlashForth 5 ATmega2560 22.05.2019

' (length=39)

C:\HTMLEDIT\arduino\index.php:25:string 'words

' (length=8)

C:\HTMLEDIT\arduino\index.php:28:string 'p2+ pc@ @p hi d. ud. d> d< d= d0< d0= dinvert d2*
d2/ d- d+ dabs ?dnegate dnegate s>d rdrop endit next for in, inline repeat while again
until begin then else if zfl pfl xa> >xa x>r dump .s words >pr .id ms ticks r0 s0 latest
state bl 2- ['] -@ ; :noname : ] [ does> postpone create cr [char] ihere ( char ' lit
abort" ?abort ?abort? abort prompt quit true false .st inlined immediate shb interpret
'source >in tiu tib ti# number? >number ud/mod ud* sign? digit? find immed? (f)
c>n n>c @+ c@+ place cmove word p'... (length=1307)
If you have this result, it's because the PHP script has perfectly communicated with the ARDUINO card!
In our PHP code, we ran fputs($comport,"words\n");. In
clear, we passed the word FORTH words followed by a carriage return
\n (equivalent to pressing Enter).
We put a one second delay between each order, the time for the stamp
receive the information transmitted by the ARDUINO card,
here the contents of the FORTH dictionary after execution of words.
Interest of this type of connection
From the WEB server, it is possible to query the parameters of the card, state of the pines, registers, etc ...
Example: your card reads the temperature of a horticultural greenhouse. With the web server you can query the ARDUINO card and save in a real database these temperature readings.
Since the character strings transmitted to the ARDUINO card are generally FORTH words, you can remotely activate any function. In the case of our horticultural greenhouse, Ventilation can be closed if the general temperature is too low.
If your web server is visible from the Internet (provide secure access), you can access your server from anywhere in the world, whether from a PC, tablet, a smartphone ...
We will see this in a detailed and very simple example: how to light and turn off an LED connected to pin 26.
Turn on and off an LED from the Internet
We will analyze in detail how FORTH will help us manage the ports on an ARDUINO board, but especially how FORTH will communicate with a web application.
Manage in FORTH a led on the pine 26
We will first set the registers of PORT B and define the bit mask of pin 26:
37 constant PORTB    \ définition registre PORT du port B
36 constant DDRB     \ définition registre DDR  du port B
35 constant PINB     \ définition registre PIN  du port B
%10000000 constant PIN26 \ masque binaire du PIN26
We then define init-ddrb which selects all the pins of the
PORT B output:
: init-ddrb ( ---)
    $ff DDRB c! ;       \ initialise PORT B en sortie sur les huit bits
Caution: do not confuse physical connector numbers and pin numbers
On the ARDUINO cards, the physical connectors are marked, some by numbers, others by their function, example: GND, TX, RX, 5V, etc ...
The mapping for associating pin numbers with physical connectors is in this document:
Pin out map on ARDUINO DUE
Pin out map on ARDUINO MEGA 2560
Pin out map on ARDUINO MICRO
Pin out map on ARDUINO NANO
Pin out map on ARDUINO UNO
Pin out map on ARDUINO YUN
For example, the led '13' which is connected to the ARDUINO MEGA board with the physical terminal 13 is related to the PIN 26. In all our texts, the term "pin" will always refer to PIN code XX as referenced in the technical documents of ARDUINO cards. The mention of a physical connector will be done with the term 'terminal'. Example:
PIN 19 (terminal 53) (penultimate terminal, all at the bottom, left on an ARDUINO MEGA 2560 board)
To learn more about how to program the connectors of the different ARDUINO boards:
Understanding ARDUINO card connectors
In order to set the PORT B output when starting the ARDUINO card, we will type manually this from the terminal connected to the ARDUINO board:
' init-ddrb is turnkey
Thus, each time the ARDUINO card is started, the word init-ddrb will be executed.
If we did not do this initialization, the ignition and extinguishing actions of
the LED on the pin 26 would be inoperative or random ...
We define led26? which stacks the state of the LED. If we
execute led26?, we will have as result:
- 0 (alias
false), indicates that the LED on pin 26 is off - 65535 (alias
true), indicates that the LED on pin 26 is on
: led26? ( --- )        \ récupère état LED connectée au pin 26
    PORTB c@
    PIN26 and
    0= if               \ LED sur pin 26 éteinte
        ." éteinte"
    else                \ LED sur pin 26 allumée
        ." allumée"
    then ;
And finally, we define two words, led26-on and led26-off,
respectively to turn on and off the LED connected to PIN 26.
: led26-on ( ---)       \ allumage LED sur PIN 26
    PINB c@             \ recupere contenu registre PIN du port B
    PIN26 or            \ OU logique avec valeur et masque PIN26
    PORTB c! ;          \ met resultat dans registre PORT du port B
: led26-off ( ---)      \ extinction LED sur PIN 26
    PINB c@             \ on recupere le contenu du registre PIB du port B
    PIN26 $ff xor       \ on recupere le masque de bit et on inverse les bits
    and PORTB c! ;      \ ET logique et remet valeur dans registre PORT B
These words are tested after compiling them in FORTH. Turn on the terminal, then we test in interpreter mode these different words. Here is exactly what is displayed on the ARDUINO card:
  ok<#,ram>
init-ddrb  ok<#,ram>
led26? éteinte ok<#,ram>
led26-on  ok<#,ram>
led26? allumée ok<#,ram>
led26-off  ok<#,ram>
led26? éteinte ok<#,ram>
  ok<#,ram>
If everything went well, the LED connected to pin 26 had to turn on and off.
Now let's see how to handle this from a PHP script encapsulated in a Web page....
Manage the led on pin 26 from a PHP script in a web page
Here is the content of our index.php page that will allow us to turn on and off our LED connected to pin 26 on the ARDUINO board:
<!DOCTYPE html>
<html>
<head>
<title>gestion carte ARDUINO sur COM7</title>
<meta charset="UTF-8">
<meta http-equiv="Content-Type" content="text/html; charset=utf-8" >
</head>
<body>
<article>
<h1>Allumer éteindre LED sur pin 26</h1>

<?php
function initCom($device='COM7') {
    exec("mode $device BAUD=38400 PARITY=1 DATA=8 STOP=n xon=on octs=off rts=on");
//    exec("mode $device BAUD=38400 PARITY=n DATA=8 STOP=1 xon=off octs=off rts=on");
    $comport = @fopen($device, "wb+");
    if ($comport) {
        fputs($comport,"\n\n");
        usleep(300000);
        $result = fgets($comport);
    } else {
        die("erreur port ".$device);
    }
    return $comport;
}

function closeCom($handle) {
    if ($handle!=null) {
        fclose($handle);
    }
}

function sendArduino($forth) { // transmission un ou plusieurs mots FORTH
    $handle = initCom();
    fputs($handle,$forth."\n");
    usleep(300000);
    $result = utf8_encode(fgets($handle));
    closeCom($handle);
    return $result;
}

function getEtatLed() {
    return sendArduino("led26?");
}

function led26on() {
    return sendArduino("led26-on");
}

function led26off() {
    return sendArduino("led26-off");
}
?>
<p><b>LED: </b><?php echo getEtatLed(); ?></p>

<form action='index.php' method='POST'>
    <input type='submit' name='action' value='allumer'/>
    <input type='submit' name='action' value='éteindre'/>
</form>
<?php
if (isset($_POST) && !empty($_POST)) {
    if ($_POST['action']=='éteindre') {
        led26off();
    } elseif ($_POST['action']=='allumer') {
        led26on();
    }
}
?>
</body>
</html>
Some explanations:
initCom($device='COM7')is the function that initializes the serial port, here the COM7 port. This function returns the handle management of the serial port.closeCom($handle)is the function that closes the serial portsendArduino($forth)transmits a FORTH string to the serial port. Get the answer and return it as data.getEtatLed()sendled26?to the serial port, which is like typing this word as if the terminal was connected to the ARDUINO boardled26on()sendled26-onto the serial portled26off()sendled26-offto the serial port
Access to the PHP script from a touch pad
If Apache has been correctly configured, you can test the script from the PC
hosting Apache, just by opening your browser and typing http://localhost/arduino.
Here's how to make this script accessible on your local network: Rendre WAMP accessible en réseau local.
You then have to find the local address of the PC hosting the script of ignition and extinction of our LED,
for our case: 192.168.1.9.
We take the digital tablet (a smartphone is also the case), it connects to the local network WiFi, we open the browser, then we type:
http://192.168.1.9/arduino/. If all goes well, you should see this on the screen of the
tablet or smartphone:
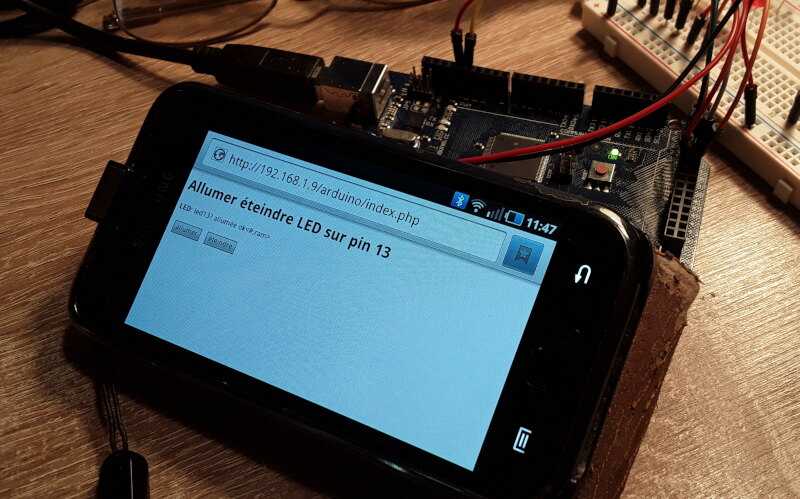
Screen copy of what we see on the PC:
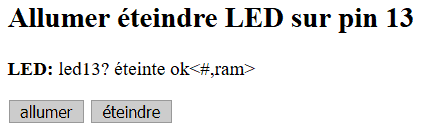
On this screen, we have the status of the LED as tested before an action "turn on" or "turn off". These actions are initiated by simply clicking on one of the two buttons (in gray on the screen photo).
As a conclusion
We did not focus on the design of the application. The primary goal is to do as as simple as possible, but above all efficient and functional.
It lacks, for example, a whole lot of additional routines managing the reliability of serial communication between the server and the ARDUINO card. We leave you to set up these routines.
But if you have followed everything and eventually experimented, you will find that build a web interface to control an ARDUINO card is at your fingertips.
In our example of LED switching on and off, we have limited the scope of our server to a restricted access to the local network, ie to the devices connected to your box or Internet router. In principle, the application localhost/arduino is not accessible from Internet.
It is possible to make this application visible from the Internet. But this is not the subject of our article.
If the application is visible from the Internet, you can order your application programmed in FORTH and connected to your private web server from your smartphone, wherever you are, connected in WiFi or 3G/4G/5G.
Finally, you will have noticed that we can control actions on the ARDUINO board programmed in FORTH language
simply by indicating the words to execute (led26? led26-on led26-off) without having
to nest these words in a loop or any other general function. Because, in FORTH language, every word remains
accessible from the moment it is defined in the dictionary ...